





The zebra succulent (botanically classified as Haworthiopsis attenuata and Haworthiopsis fasciata) exhibits remarkable structural resilience, generating genetic clones from the base of its rosette via stolon-like underground stems. Separating these offshoots—horticulturally referred to as offsets or pups—not only multiplies your collection, but is also a critical physiological necessity for preserving the mother rosette's photosynthetic energy, vascular continuity, and cellular water balance.
Offset division is not a blunt pull-and-tear process; rather, it is a surgical biological intervention that demands clean detachment of vascular bundles (xylem and phloem conduits) without crushing surrounding parenchyma tissues, followed by the synthesis of a protective suberized callus layer against opportunistic soil pathogens.
1. Botanical Biology and Physiological Foundations of the Technique
Zebra succulents are monocotyledonous plants adapted to arid South African ecosystems, utilizing Crassulacean Acid Metabolism (CAM). In accordance with this metabolic adaptation, they open their stomata at night and seal them during daylight hours to strictly minimize transpiration-driven water loss. In the subterranean zone, they develop a thick, fleshy, water-storing adventitious root architecture.
As the primary rosette matures, active meristematic cell clusters situated at the basal stem produce lateral shoots (offsets). Initially, these pups remain metabolically dependent, drawing sustenance directly from the mother plant's established vascular network. Over time, they initiate their own autonomous adventitious root primordia. An offset excised prematurely cannot regulate its internal osmotic pressure or sustain the CAM cycle independently. Conversely, leaving them clustered indefinitely restricts the rhizosphere, causes severe root binding, and drops subterranean oxygen concentrations below 20%, fostering an environment ripe for anaerobic bacterial pathogens.
2. Accurate Diagnosis: Symptoms That Indicate Separation Is Due
Key morphological and spatial indicators signaling that your zebra succulent is ready for offset division include:
- Root Binding and Container Deformation: Offsets pressing hard against the pot's interior periphery, roots protruding from basal drainage holes, or visible lateral warping of plastic containers.
- Asymmetry and Basal Foliar Chlorosis in Mother Rosette: Lower foliage of the parent rosette displaying chlorosis (yellowing) and diminished turgor pressure caused by excessive nutrient diversion to offspring.
- Compromised Airflow and Microclimates: Tightly packed rosettes creating stagnant humidity pockets at the core, facilitating insidious mealybug (Pseudococcidae) infestations.
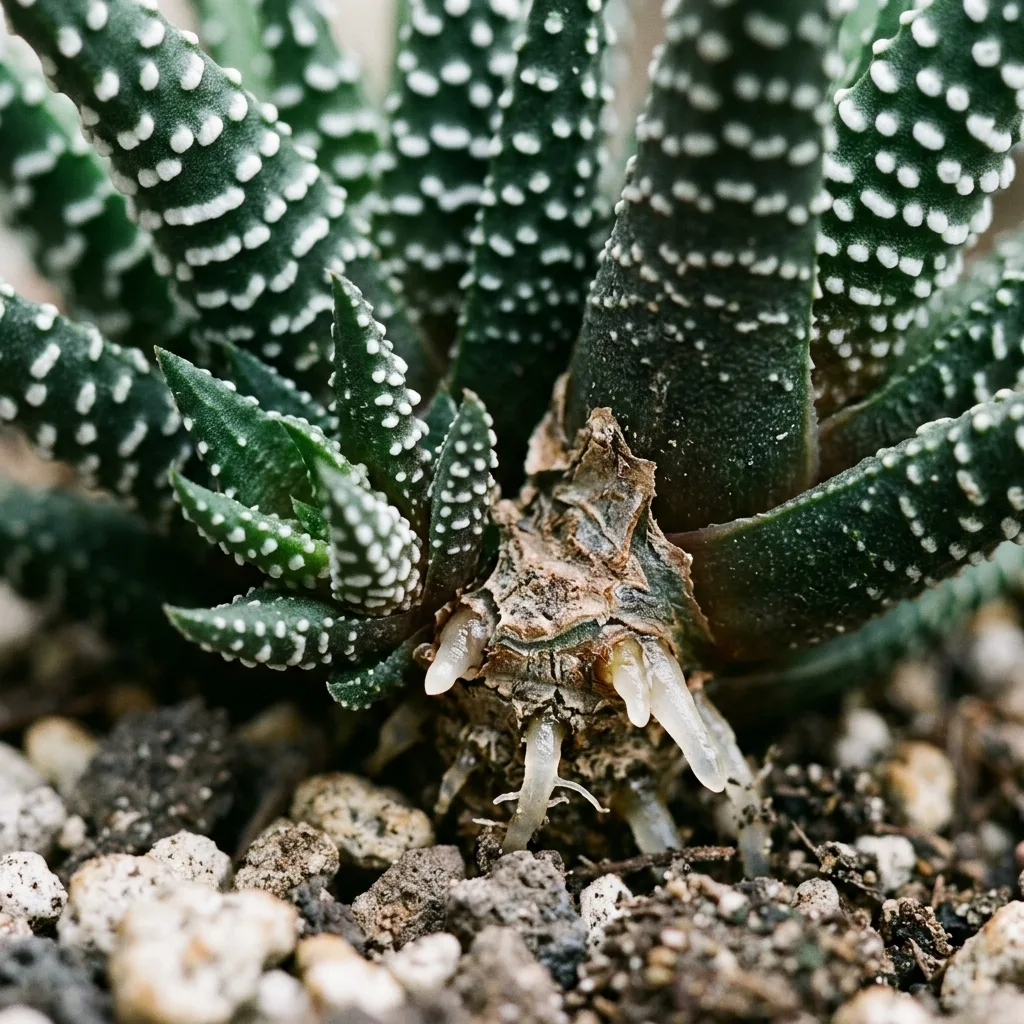
- Distinct Pup Morphology: The offset having formed 4 to 6 rigid, white-tubercled leaf whorls around an independent, well-defined basal stem.
3. Step-by-Step Division and Rooting Protocol
To preserve cellular integrity and eliminate fungal infection vectors, execute the offset removal process using the following systematic protocol:
A. Pre-Hydration and Turgor Regulation
Lightly hydrate the mother plant 3 to 4 days prior to intervention. This maximizes cellular turgor and dampens excision-induced osmotic shock. At the time of surgery, the growing medium should be slightly damp and loose, neither bone-dry nor waterlogged.
B. Unpotting the Root Ball Safely
Never tug a zebra succulent out by its leaves; the succulent foliage is brittle, and the ornamental tubercles can fracture easily. Invert the pot while supporting the base, tapping the bottom gently to slide out the intact root mass. Carefully untangle the root zone and gently loosen legacy substrate using your fingertips or a soft detailing brush.
C. Surgical Excision of Vascular Connectors
Using a fine-point pruning scalpel or budding knife sterilized with 70% isopropyl alcohol, locate the stolon (runner stem) connecting the pup to the mother axis. Execute a clean, single-plane cut flush with the mother stalk without gouging its primary stem parenchyma. Preserve all established adventitious roots attached to the pup.
D. Callusing and Suberization
Dust the fresh wound surface with sulfur powder or ground cinnamon to serve as a natural antifungal barrier. Do not pot the offsets immediately. Allow the wounded tissue to rest in a dry, shaded, and well-ventilated location for 48 to 72 hours, enabling the wound cells to synthesize suberin and generate a tough, protective callus.
E. Potting and Acclimatization
Seat the callused pups into small (5–7 cm) porous terracotta pots filled with an open, highly inorganic mineral substrate. Absolutely refrain from watering during the initial 5 to 7 days; this pause allows fragile root hairs to establish microscopic contact with granular surfaces without risk of moisture-induced rot.
4. Required Equipment, Materials, and Technical Specifications
Successful vegetative propagation depends on adhering to the biological substrate and environmental parameters outlined below:
| Component / Equipment | Specification / Ratio | Function and Botanical Significance |
|---|---|---|
| Substrate Formulation | 40% Pumice + 30% Lava Grit + 20% Akadama/Zeolite + 10% Peat Moss | Maintains macro-porosity ensuring >25% air-filled porosity, precluding hypoxic conditions. |
| Sterilizing Agent | 70% Isopropyl Alcohol or Flame | Neutralizes virulent systemic pathogens such as Fusarium and Phytophthora species. |
| Antifungal Sealant | Pure Elemental Sulfur or Activated Charcoal Powder | Desiccates wound exudates and forms a chemical seal against latent fungal spores. |
| Container Selection | Unglazed Terracotta with Basal Drainage Hole | Promotes lateral moisture evaporation through porous walls, preventing root-zone asphyxiation. |
| Light Intensity (First 2 Weeks) | 1500–2500 Lux (Filtered Ambient Light) | Prevents photo-oxidation of chlorophyll and curtails transpirational demand on rootless tissue. |

5. 5 Common Pitfalls and Rescue Protocols
- Yanking the Pup Directly by Hand: Leaves the viable root system behind on the mother and leaves shredded, torn vascular strands on the pup. Rescue: Make a clean razor cut across the ragged base, dust with sulfur, and extend callusing time to 5 days before dry potting.
- Watering Open Wounds Immediately: Flooding unsealed xylem vessels introduces soft-rot bacteria. Rescue: Unpot the pup at once, excise any softened or discolored basal tissue, apply a systemic fungicide, and restart rooting in dry pumice.
- Planting into an Oversized Pot: Excess soil volume holds residual moisture indefinitely, suffocating emerging root initials. Rescue: Downsize the pot immediately so the diameter is only 2–3 cm wider than the pup's rosette span.
- Direct Exposure to Midday Sunlight: Unrooted offsets ramp up anthocyanin production, turning purple-brown as photosynthetic pathways stall. Rescue: Move to bright, indirect shade behind sheer curtains and moderately increase ambient humidity.
- Using Heavy, Peat-Dense Garden Soils: Dense substrates compact rapidly, cutting off oxygen diffusion to Haworthiopsis roots. Rescue: Rinse the root area completely under running water and repot into an inorganic, pumice-rich gritty mix.
6. Seasonal Calendar and Long-Term Vegetative Outlook
The optimal seasonal windows for dividing zebra succulents are early spring (March to May) and early autumn (September to October). Members of the genus Haworthiopsis enter a semi-dormant (estivation) state during extreme summer heat (exceeding 32°C / 90°F), while winter low temperatures halt cellular division. Dividing in spring aligns the wound response with naturally increasing photoperiods and ambient warmth, stimulating vigorous meristematic development.
When executed under sterile, structured protocols, separated offsets begin producing active absorbent root hairs within 3 weeks. By the second month, fresh, vibrant green leaves emerge from the rosette's center. Concurrently, the unburdened mother plant redirects photosynthate toward plump foliar growth, revitalizing its architecture to generate vigorous new offsets in upcoming seasons.


Reader Reviews & Comments 3 Reviews
Eleanor Vance
Marcus Bennett
Clara Higgins
Leave a Review & Rating
Share your plant care tips, experiences, or questions with our succulent community.