






Cactus propagation and proper planting techniques rely on the active cell division potential of apical and lateral meristematic tissues within plant physiology. The moment a cutting is excised from a cactus stem or offset, it triggers an intensive cellular defense mechanism. The foundation of adventitious root development involves the basipetal transport and accumulation of endogenous auxin (primarily indole-3-acetic acid / IAA) at the wound interface, which stimulates adventitious root primordia.
The most common botanical mistake made during cactus planting is inserting freshly excised succulent tissue directly into damp soil. Because members of the Cactaceae family possess water-storing parenchyma cells, a fresh cut represents an open wound. If planted before the cell walls undergo suberization and lignification to form a protective callus, opportunistic soil-borne pathogens (such as Fusarium, Pythium, and Rhizoctonia species) penetrate the exposed tissue, rotting the vascular bundles.
Featuring Crassulacean Acid Metabolism (CAM) photosynthesis, cacti minimize transpirational moisture loss by opening their stomata at night and sealing them during the day. This metabolic adaptation enables an unrooted cutting to survive for months on its internal water reserves while developing a new root system. Successful planting is not merely placing a cutting in soil; it is curating an optimal environment for these cellular defense and rooting pathways.
1. Botanical Fundamentals of Cactus Propagation
Propagating and planting cacti from cuttings is governed by the principles of vegetative reproduction. Specialized bud structures known as areoles contain totipotent meristematic cells capable of producing spines, new shoots, or adventitious roots as physiological cues dictate. When a stem cutting or lateral pup is removed, cells within the areoles closest to the basal cut differentiate to initiate root primordia.
The auxin-to-cytokinin hormonal ratio plays a decisive role in triggering root morphogenesis. Following excision, auxin moving downward from the apex concentrates at the cut site to initiate root induction, while relatively low cytokinin concentrations favor root elongation. Shielding the cut tissue from biological contamination and excess humidity is paramount during this phase so that nascent root cells can respire without suffocation.
2. Essential Sterile Equipment and Mother Plant Preparation
Success in cactus propagation directly correlates with maintaining an aseptic working environment. Thorough equipment preparation is vital to prevent fungal and bacterial inoculation:
- Sterile Cutting Tools: A razor-sharp scalpel, grafting knife, or utility blade disinfected with 70% isopropyl alcohol or flame-sterilized. A clean, razor-edge cut prevents crushing and ragged mechanical damage to plant cell walls.
- Protective Gear: Heavy-duty nitrile-coated leather cactus gloves or dense styrofoam blocks/silicone tongs to guard against glochids and sharp spines.
- Antiseptics and Wound Dressings: Micronized elemental sulfur powder or organic ground cinnamon (which offers mild antifungal properties).
- Aerated Containers: Unglazed terracotta or porous ceramic pots featuring generous drainage holes at the base.
3. Step-by-Step Cutting and Callusing Protocol
The callusing stage is the physiological cornerstone of cactus propagation. Rushing this step is the primary cause of cutting loss:
- Make a Clean Cut: For columnar or segmented stems, cut cleanly through narrow nodal joints; for basal offsets (pups), sever at the narrowest attachment point with a single, smooth stroke. Jagged cuts increase tissue necrosis.
- Inspect the Vascular Ring: Confirm that the cut surface is uniformly pale green or whitish without discoloration. Any brown vascular rings indicate preexisting systemic rot, requiring further cuts into healthy, pristine tissue.
- Apply Fungicidal Powder: Dust a thin, even layer of micronized sulfur powder over the moist cut surface using a soft, sterilized brush.
- Dry in Warm, Filtered Shade: Place the cutting upright or at a 45-degree angle in a warm (20-25°C / 68-77°F), well-ventilated space out of direct sunlight. Depending on cutting diameter, this drying period takes 3 to 5 days for small offsets and 10 to 20 days for thick stem sections. Callusing is complete when the wound tissue turns hard, leathery, matte, and entirely dry to the touch.
4. Ideal Rooting Media and Substrate Selection
Unrooted cactus cuttings require exceptional gas exchange and near-zero moisture retention rather than rich organic matter. The following table contrasts the performance of common rooting media:
| Substrate Type | Air Porosity (%) | Water Retention | Pathogen Risk | Rooting Success Rate |
|---|---|---|---|---|
| Dry Horticultural Pumice (3-6 mm) | 65% - 75% | Very Low | Negligible | Excellent (95%) |
| Coarse Perlite / Zeolite Mix | 55% - 65% | Low | Low | High (85%) |
| Standard Potting Soil + Peat | 25% - 35% | High | High (Fungal Growth) | Moderate-Low (45%) |
| Water Rooting | 0% - 5% | Excessive | Critical (Hypoxia & Rot) | Extremely Low (10%) |
Once callused, position the cutting only 1 to 2 cm deep into a dry medium composed of 70% inorganic pumice/lava grit and 30% sifted commercial cactus soil. Burying stems too deeply suffocates tissue and invites basal decay. Use larger volcanic rocks or decorative gravel around the base to stabilize upright growth without compacting the soil.

5. Light, Temperature, and Moisture Dynamics During Rooting
Because an unrooted cutting cannot take up water, direct, intense sunlight induces chloroplast photoinhibition and leads to dehydration, scorching, and chlorosis. Provide bright, filtered sunlight or position the cutting inside a greenhouse with 50% shade cloth.
Maintain daytime ambient temperatures around 22-28°C (72-82°F) and nighttime drops to 16-18°C (60-64°F). This diurnal temperature fluctuation optimizes CAM metabolism, enabling nocturnal malic acid accumulation and gas exchange. Do not saturate the substrate. Instead, mist the surface lightly every 4 to 5 days without wetting the cutting itself; positive hydrotropism and geotropism will guide emerging root tips toward the ambient moisture below.
6. Potting Established Cuttings and Acclimatization
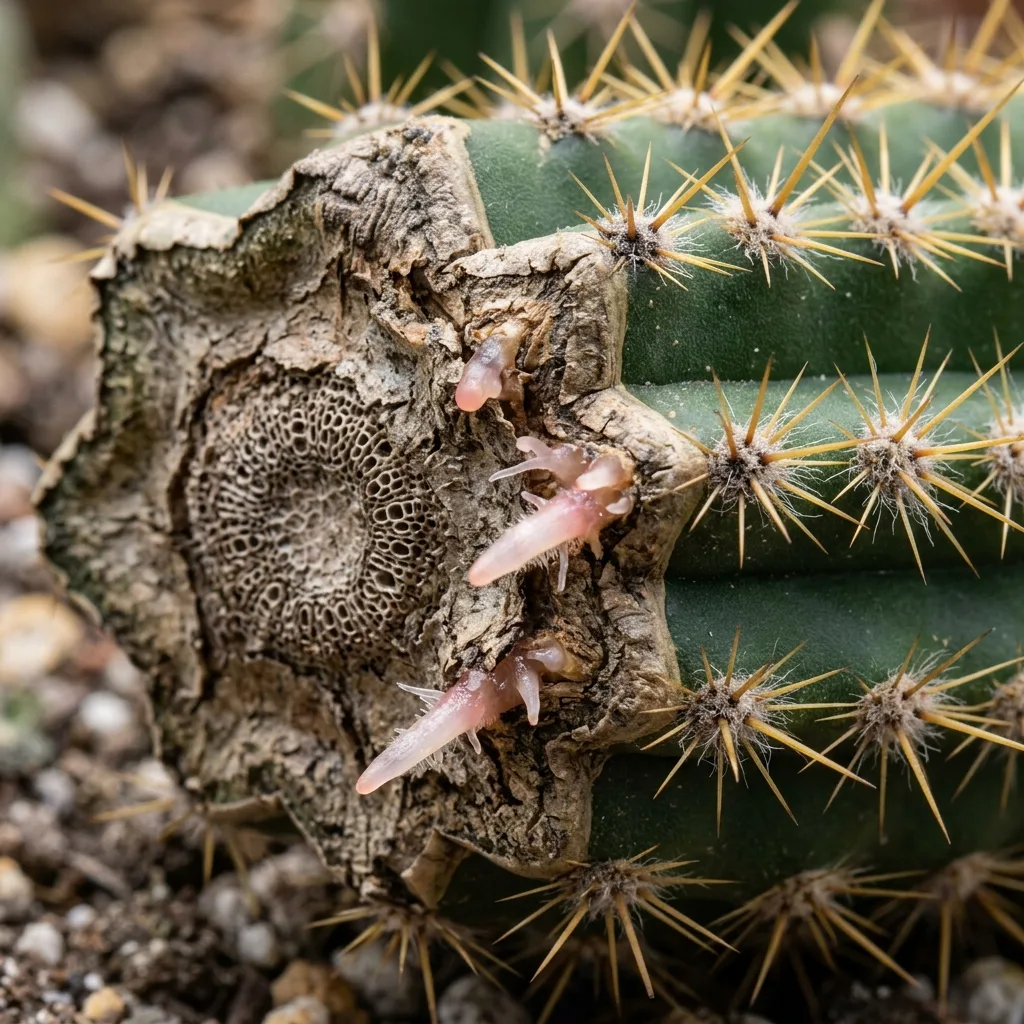
Within 3 to 6 weeks, pinkish, root-hair-covered adventitious roots will emerge along the margins of the callus tissue. A gentle upward tug against slight resistance confirms that the root system has anchored into the mineral matrix.
Administer the first true watering only after root formation is verified. Provide a modest volume of water and ensure the substrate dries out completely within 2 to 3 days. Once fresh, light green growth appears at the apical meristem, gradually harden off the cactus by exposing it to 2 to 3 hours of direct morning sunlight daily.
7. Troubleshooting Propagation Failures
Most complications during cactus rooting stem from lack of aeration or fungal infection:
- Soft, Blackened Base: Fungal rot caused by premature watering or incomplete callus formation. Salvage the cutting by slicing cleanly 1 to 2 cm above the rot into healthy green tissue, dusting with sulfur, and repeating the callusing phase.
- Severe Shriveling: Excessive transpiration in high-heat environments. Move the cutting to a cooler, bright location with indirect light and slightly raise ambient room humidity.
- Delayed Root Induction: Cuttings taken during winter dormancy possess sluggish metabolic rates. Placing the pot on a seedling heat mat set to 24°C (75°F) will stimulate cell division and break dormancy.


Reader Reviews & Comments 3 Reviews
David Miller
Julian Vance
Emma Watson
Leave a Review & Rating
Share your plant care tips, experiences, or questions with our succulent community.