






From the arid, sun-bleached rock fissures of the Sonoran Desert to the cozy windowsill in your living room, cacti stand as nature’s most resilient survivalists. When ferocious desert gales snap columnar stems or foraging wildlife tears off lateral pads, those severed branches do not perish. Instead, tumbling onto scorching sands and sending out vigorous new root networks months later, they perform one of the plant kingdom’s most refined regenerative miracles. Taking a cutting from your beloved houseplant—whether an upright column cactus or a Prickly Pear (Opuntia)—and coaxing it into an independent life is entirely achievable; however, The Art of Scientific Stem Cuttings and Rooting">this is fundamentally different from rooting a common houseplant cutting in a glass of water.
Cactus tissue is essentially a massive reservoir of specialized parenchyma cells, evolutionary marvels engineered to bind water molecules in the form of protective mucilage under hyper-arid conditions. The moment you sever a cactus limb, fresh cytoplasmic cell sap spills out into the open atmosphere. Left unmanaged, this moist wound turns into an open banquet for opportunistic pathogenic fungi and soft-rot bacteria within mere minutes. The true secret to successfully planting a cactus cutting does not hinge on 'when' you insert it into the substrate, but rather on how meticulously that exposed cut surface builds its own impenetrable biological shield.
In this master guide, we will unpack how to awaken the dormant rooting potential encoded within the cellular memory of your cactus cuttings. We will examine why callus formation is biologically non-negotiable, how to bevel thick stems, and what structural mineral balance guarantees vigorous adventitious roots without a trace of decay. Pour yourself a warm cup of coffee, and let’s embark on a scientifically rigorous yet profoundly practical journey into the cellular world of your succulents.
1. The Botanical Foundations of Cactus Propagation
When you sever a section of a cactus, you intentionally engage the plant’s innate vegetative propagation mechanisms. Distributed along the ribs and epidermis of cacti are specialized meristematic centers known as areoles. Evolutionary modifications of condensed lateral buds, areoles house reservoirs of totipotent stem cells capable of differentiating into spines, glochids, floral buds, lateral branches, or adventitious roots depending on environmental stimuli. Making a clean severance breaks apical dominance, which immediately redirects the polar transport of auxin—the primary plant growth phytohormone—downward toward the wound margin.
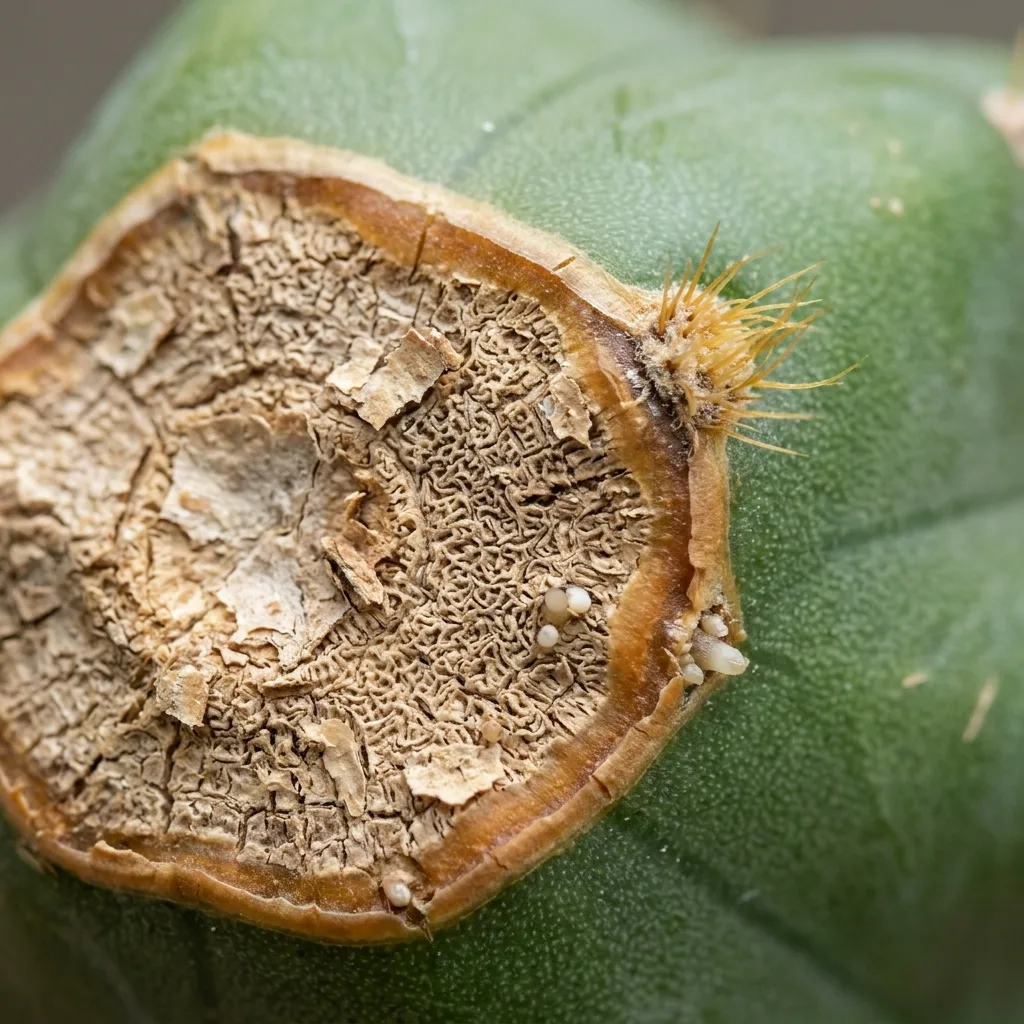
At the severed surface, mitotic cell division surges dramatically. Yet, allowing raw plant tissue to touch moist soil at this point spells disaster. The freshly exposed parenchyma cells possess high water potential and abundant nutrients. To isolate this vulnerable zone, the plant mobilizes suberin and lignin, depositing these hydrophobic biopolymers across cellular walls to synthesize a resilient, cork-like protective shield. In plant morphology, this barrier is termed a callus. If a cutting is placed into damp soil before this suberized callus fully matures, ubiquitous soil-borne saprophytic fungi—such as Fusarium, Pythium, and Rhizoctonia species—invade the open vascular bundles (xylem and phloem), liquefying the internal succulent tissue into black mush within days. Remember this foundational principle: it is not damp potting soil that generates root primordia; rather, it is the mature callus and an innate cellular thirst that compels the cutting to seek moisture.
2. Sterile Surgical Tools and Mother Plant Preparation
Taking a cactus cutting requires operating-room hygiene. Dull or contaminated blades crush cellular walls, causing localized necrosis and providing entry vectors for microscopic spores. Assemble the following materials and prepare the donor plant meticulously:
- Scalpel or Straight Razor: A non-serrated, razor-sharp surgical scalpel or high-carbon steel utility blade. Kitchen knives crush parenchymatous tissue and must be avoided.
- Sterilization Agent: 70% isopropyl alcohol or ethanol. Thoroughly wipe and disinfect the cutting edge before every single cut, allowing it to air-dry.
- Thick Leather Gloves or Folded Newspaper Collars: Essential for safe handling without piercing your skin or abrading the plant's delicate epicuticular wax (farina), which prevents excessive water evaporation.
- Sublimed Sulfur Powder or Pure Cinnamon Powder: Natural fungistatic agents that dry and protect raw incisions against spore colonization.
- Mother Plant Preparation: Never excise a cutting from a severely dehydrated, shriveled specimen, nor from one engorged immediately after irrigation. Select a healthy donor plant 4 to 6 days after its last thorough watering, ensuring optimal cellular turgor pressure during the active spring-to-early-summer vegetative surge.
3. Step-by-Step Cutting and Callus Protocol
Follow this surgical protocol to achieve a near-perfect success rate when rooting columnar cacti and pad-forming species:
- Locate the Anatomical Junction: For segmented or pad-bearing species like the Prickly Pear (Opuntia) or Holiday Cacti (Schlumbergera), sever the joint cleanly right at the natural, narrow articulation point, or gently twist the mature pad free. For columnar varieties such as Cereus, Trichocereus, or Echinopsis, take an apical cutting measuring 10–15 cm (4–6 inches) from the firmest, actively growing upper stem.
- Bevel the Cutting Edge: As the dense water-storing parenchyma of a columnar cutting dehydrates, it shrinks and contracts inward. A completely flat transverse cut creates a concave depression with elevated outer ribs. When potted, that hollow pocket traps stagnant air and prevents central vascular tissues from touching the substrate. To prevent this, bevel the perimeter of the green rind at a 45-degree angle—resembling a sharpened pencil—leaving the central vascular cylinder protruding slightly.
- Antiseptic Sealing: Immediately dust the moist, freshly cut end with a fine, uniform layer of elemental sulfur powder or fresh agricultural cinnamon. This seals open channels and suppresses early spore germination.
- Callus Curing in the Shade: Stand the cutting strictly upright in a dry, well-ventilated room receiving bright, indirect light—never direct sun. Do not lay thick columnar cuttings horizontally on flat surfaces; gravity will trigger asymmetric auxin accumulation, causing the tip to warp and curve upwards permanently (negative gravitropism).
- Duration and Callus Inspection: Flat pads (like Opuntia) form a secure callus within 4 to 7 days. Thick columnar cuttings, however, require 2 to 4 weeks for the parenchyma to produce a firm, leathery, whitish-gray suberized barrier. Before planting, ensure the cut feels completely dry, hard, and devoid of any spongy or tacky sensations.
4. Ideal Rooting Substrates and Media Porosity
A callused cutting does not seek fertilizers or rich organic matter; it requires oxygen, micro-capillary contact, and mechanical stability. Dense, peat-heavy potting mixes or garden loam suffocate dormant root initials by holding stagnant water around the unrooted base. The table below outlines how different rooting media perform:
| Substrate / Medium | Air Porosity | Rot Risk | Root Architecture | Suitability Rating |
|---|---|---|---|---|
| Pure Dry Horticultural Pumice (2–4 mm) | 85–90% | Extremely Low (2%) | Thick, fibrous, and structurally resilient | Optimal (Highly Recommended) |
| Coarse Perlite + Sharp River Sand Mix | 75–80% | Low (8%) | Good, though perlite can float and shift | Very Good |
| Mineral Blend (70% Pumice, 30% Coarse Grit) | 60–65% | Moderate (15%) | Fast-adapting root systems with high vigor | Good (With Managed Moisture) |
| Standard Peat Potting Soil | 20–30% | Very High (70%) | Tissue typically decomposes before rooting occurs | Strongly Discouraged |
| Water Rooting (Water Culture) | 0% (Substrate-free) | Critical (85%) | Fragile, aquatic aerenchyma roots unsuited to soil | Not Suitable for Cacti |
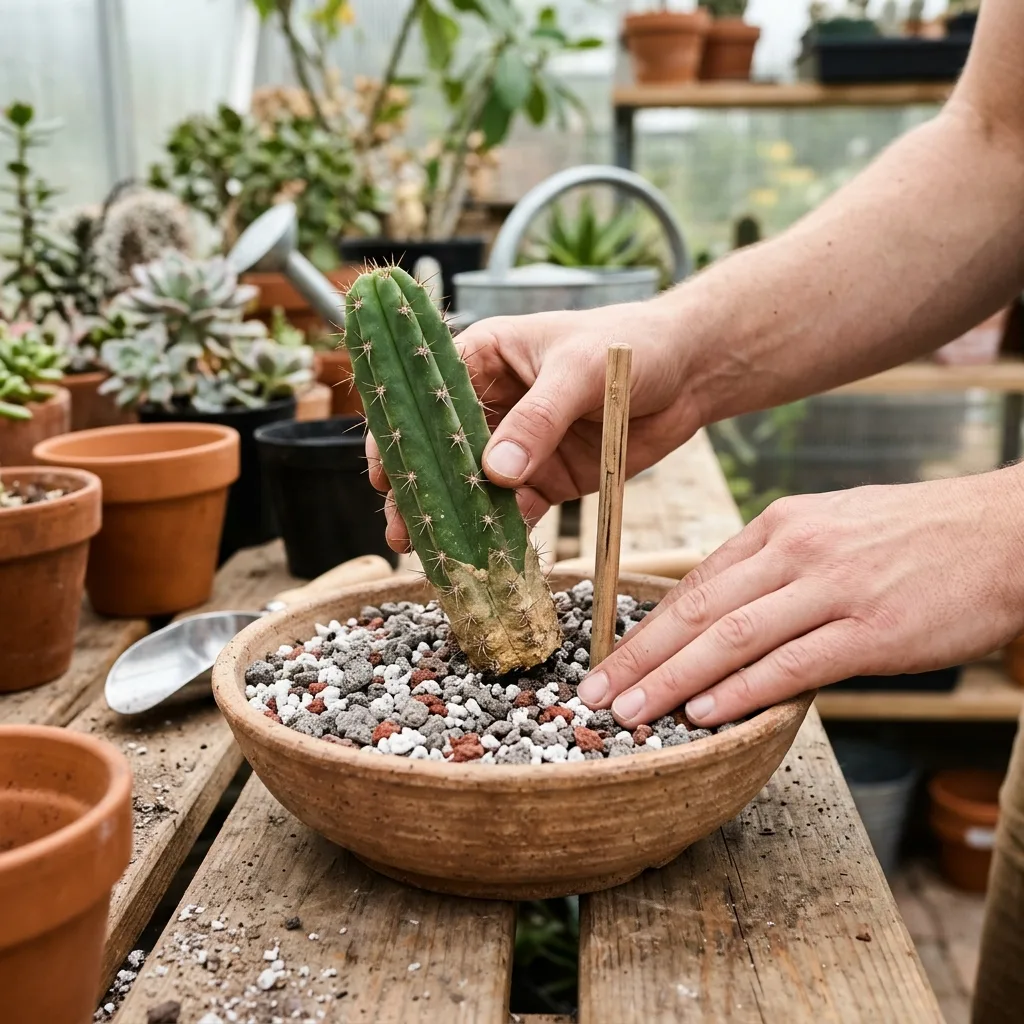
The safest, time-tested approach is setting your cutting into a small, unglazed terracotta pot filled with pure horticultural pumice or a gritty mix composed of 80% inorganic matter (pumice, crushed volcanic scoria, zeolite) and 20% coarse mineral soil. Porous unglazed clay walls wick excess moisture away from the root zone, creating the ideal breathable microclimate.
5. Light, Temperature, and Moisture Calibration During Rooting
Gently settle your callused cutting into the dry substrate, inserting it roughly 1.5 to 2 cm (around 0.75 inches) deep. Burying stem tissue too deep exponentially increases the risk of basal rot. To keep top-heavy columnar cuttings steady without deep planting, stabilize the base with a collar of heavy lava rocks or washed gravel.
- Photoperiod and Light Quality: Do not submit an unrooted cutting to intense midday solar radiation. Direct ultraviolet rays overtax cellular water reserves, causing bleaching or stress-induced red-bronze discoloration. Position the cutting where it receives 12–14 hours of bright, indirect, or dappled morning light.
- Thermal Thresholds: Cell division and auxin signaling peak when basal substrate temperatures sit comfortably between 22°C and 28°C (72°F–82°F). Temperatures below 18°C (64°F) suppress metabolic activity, stalling root emergence. Utilizing a gentle horticultural heating mat underneath the pot can shorten the rooting timeline by nearly half.
- The Watering Protocol (The Crucial Test): For the first 10 to 14 days after planting, do not apply any water whatsoever. A cutting lacking roots has no vascular intake mechanism; any water introduced to the pot only hydrates fungal spores. After two weeks, stimulate the dormant root primordia by lightly spritzing the substrate edges or bottom-wicking a minimal splash of water into the drainage saucer so moisture rises subtly toward the base without saturating the stem.
6. Potting Up and Long-Term Acclimatization
Once your cutting exhibits firm mechanical resistance when nudged and its apical meristem flushes with vibrant, lighter-green new growth, congratulate yourself: the propagation was an undeniable success. Your cutting is now an autonomous, self-sustaining plant.
Approximately 4 to 6 weeks after rooting is confirmed, you can transition the plant into a permanent potting mix tailored for long-term health:
- 40% Coarse Horticultural Pumice (3–5 mm)
- 20% Volcanic Scoria (Lava Rock) or Crushed Terracotta Grit
- 10% Clinoptilolite Zeolite (for cation-exchange capacity and anti-fungal soil buffering)
- 30% Coarse, low-tannin coconut coir or screened cactus peat
Avoid thrusting your newly established cactus directly under blistering outdoor sun. Acclimate it systematically: provide one hour of gentle early morning sunlight during the first week, two hours the second week, and gradually increase solar exposure over a month. Adhere strictly to the 'soak-and-dry' method: irrigate thoroughly until water runs freely from the bottom drainage holes, then withhold water completely until the root ball is bone-dry throughout.
7. Troubleshooting Propagation Failure: Remedial Actions
Even with meticulous care, unexpected environmental shifts can trigger stress. Here is how to diagnose and rescue struggling cuttings:
- Basal Blackening and Softness (Basal Stem Rot): The substrate was damp before a complete callus formed, allowing fungi to penetrate the vascular core. Rescue: Immediately remove the cutting from the pot. Use a sterile razor to excise all discolored, translucent tissue until you expose clean, creamy-white vascular rings and firm green parenchyma. Dust heavily with sulfur and restart the callus protocol from day one.
- Severe Shriveling and Longitudinal Wrinkles: The cutting was positioned in an overly hot, arid location, evaporating internal water before root initials could form. Rescue: Relocate the pot to a cooler, sheltered spot away from direct drafts, and provide a light morning mist around the outer rim of the pot to raise local relative humidity without wetting the base.
- Spindly, Pale Upward Growth (Etiolation): The cutting is kept in inadequate light, wasting precious carbohydrate reserves on weak, elongated growth rather than root architecture. Rescue: Relocate the cutting to a location with significantly higher ambient lux, such as behind an unobstructed south-facing window softened by a sheer curtain.


Reader Reviews & Comments 4 Reviews
Eleanor Brooks
Marcus Vance
Chloe Mitchell
Julian Thorne
Leave a Review & Rating
Share your plant care tips, experiences, or questions with our succulent community.