





Arriving in our living rooms from the arid valleys of the Sonoran Desert or the rugged plateaus of Madagascar, columnar cacti and arborescent succulents rise like monumental living sculptures in their native habitats. Within our indoor spaces, however, these stately stems occasionally attenuate and lean due to chronic light deprivation (etiolation), outgrow their containers, or require urgent surgical intervention due to insidious basal rot. Standing before an impressive green column with a sharp blade in hand naturally triggers hesitation; amputating living tissue can be emotionally daunting for any dedicated plant lover.
Yet remember: in the botanical realm, a precise surgical incision is never an end. Instead, it is a regenerative catalyst that stimulates meristematic cell division, granting your specimen a vibrant second life. Cutting a columnar cactus mirrors the natural pruning inflicted by desert gales or browsing herbivores, only performed in a controlled, sterile manner. With the proper technique, a sanitized blade, and calibrated patience, you can both encourage the parent column to produce architectural candelabra-like branches and root the amputated apical cutting into an entirely independent specimen.
1. Taxonomic Identity, Areole Morphology, and Spine Anatomy
Before introducing a scalpel to any columnar stem, we must thoroughly grasp the anatomy of the plant before us. Many hobbyists conflate true columnar cacti (family Cactaceae) with columnar succulent spurges (most notably Euphorbia trigona or Euphorbia ingens). True columnar cacti—such as Trichocereus pachanoi (San Pedro), Cereus peruvianus, Carnegiea gigantea (Saguaro), and Cleistocactus strausii—bear specialized, highly condensed vegetative growing points termed areoles. Spines, glochids, trichomes, and floral buds emerge exclusively from these areoles.
Examining a cross-section of a columnar cactus reveals a circular vascular ring composed of coordinated xylem and phloem bundles, surrounded by massive, hydrenchymatous cortical parenchyma cells specialized for water storage. Our primary surgical objective is to cleave this central vascular cylinder cleanly without crushing its fibrous structure. Conversely, if your plant is a columnar Euphorbia, your cut will exude an opaque, caustic latex sap rich in diterpene esters. This sap causes acute dermal inflammation and severe chemical ocular burns; never handle severed Euphorbia tissue without protective gloves and safety glasses.
2. Light Spectrum, Photosynthetic Active Radiation, and Ventilation Regimes
The foremost cause compelling indoor gardeners to sever a columnar cactus is chronic light deficiency. When photosynthetic active radiation (PAR) drops below physiological maintenance levels, the apical meristem stretches upward toward light reserves. Because chlorophyll synthesis declines under poor irradiance, this new tissue grows narrow, pale green, structurally fragile, and vulnerable to mechanical collapse. This etiolated apex must be surgically removed to restore structural equilibrium and plant vigor.
Following surgery, the illumination and environmental balance for both the rooted mother base and the top cutting become paramount: neither should be exposed to scorching, direct midday sunlight. Because the wounded surface lacks a protective suberized cuticle, intense UV rays can desiccate the exposed parenchyma cells, leaving necrotic brown scald scars. The optimal setting is abundant, bright ambient light filtered through sheer curtains, paired with generous air movement. Stagnant, humid microclimates act as an open invitation for opportunistic fungal pathogens, notably Fusarium oxysporum and Botrytis cinerea, to germinate across the moist cut surface.
3. Irrigation Cycles and Winter Dormancy Protocols
Surgical intervention must align precisely with the plant's metabolic rhythm. Cacti enter cold-induced vegetative dormancy throughout winter (typically November through February), downregulating growth hormones and minimizing vascular sap flow. During this period, cellular turgor is low and tissue repair proceeds at a crawl. Severing a columnar cactus in the dead of winter paralyzes its healing capacity, driving rot incidence exponentially upward.
The golden window for cutting spans mid-spring to early summer (April through June). During active growth, wound periderm (callus) forms rapidly, and the vascular cambium aggressively diverts auxin to generate adventitious root primordia and lateral offsets (pups). Irrigate the mother plant thoroughly 7 to 10 days prior to pruning to optimize cellular hydration. However, the substrate must be completely dry on the day of the procedure. Keep the rooted stump strictly unwatered until the wound surface forms a firm crust—generally 10 to 15 days.
4. High-Mineral Cactus Substrates and Container Physics
When the fully callused columnar cutting is ready for planting—and while caring for the remaining rooted mother base—your primary defense against failure is substrate physics. Standard commercial potting soils and dense peat moss are death sentences for columnar specimens. Their root systems are genetically adapted to coarse, highly porous, fast-draining substrates that ensure rapid gas exchange around the root zone.
The table below outlines our scientific high-mineral substrate recipe designed to prevent root and basal collar rot during cutting propagation and long-term cultivation:
| Substrate Component | Ratio (%) | Grain Size | Botanical Function |
|---|---|---|---|
| Pumice | 40% | 3 – 6 mm | Stabilizes heavy columns, maintains durable macropores, and aerates hair roots. |
| Lava Rock (Scoria) | 25% | 2 – 5 mm | Gradually releases iron and magnesium without compressing or holding excess water. |
| Zeolite (Clinoptilolite) | 15% | 2 – 4 mm | Provides high cation exchange capacity (CEC), buffers nutrients, and discourages pathogens. |
| Coarse Quartz / River Sand | 10% | 1 – 3 mm | Prevents substrate settling and ensures continuous water filtration. |
| Sieved Coco Coir | 10% | Fibrous / Dust-Free | Provides a brief baseline moisture buffer so emerging root primordia do not desiccate. |
Regarding containers, unglazed terracotta pots equipped with wide drainage apertures are vastly superior to plastic or glazed ceramic. The porous walls of unglazed clay breathe, assisting in evaporating residual substrate moisture evenly from the core to the perimeter.

5. Encouraging Lateral Offsets and Balanced Nutrition
Severing the terminal apex breaks apical dominance by disrupting the downward flow of the plant hormone auxin (indole-3-acetic acid). Deprived of auxin repression, the dormant meristematic tissues inside the areoles directly beneath the incision awaken. Over several months, miniature, spherical offsets will emerge from these areoles, transforming a single spire into a multi-branched specimen.
Flooding the plant with excess nitrogen during this restorative phase will merely cause rapid, bloated, and structurally weak vegetative growth that easily tears under its own weight. To fortify tissue walls and promote future flowering, apply a low-nitrogen, high-potassium and high-phosphorus cactus fertilizer with an NPK ratio of 1-2-3 or 4-8-12. Dilute the feed to half or quarter strength and apply once monthly exclusively during the active summer growth period. Cease all fertilization during winter dormancy.
6. Step-by-Step Surgical Protocol: Propagation and Grafting Preparation
Approach the operation with disciplined surgical precision. Follow this proven protocol:
- Equipment Sanitization: Secure a razor-sharp, non-serrated carving knife or botanical grafting blade. Disinfect the blade using 70% isopropyl alcohol or briefly pass it through a blue flame, allowing it to cool completely. A dull or contaminated blade crushes cell walls and introduces pathogen inoculants into open xylem vessels.
- Handling and Physical Stabilization: Never grasp heavily spined columnar stems with bare hands. Use folded strips of heavy newspaper, scrap polystyrene foam blocks, or silicone-coated kitchen tongs to firmly support the stem.
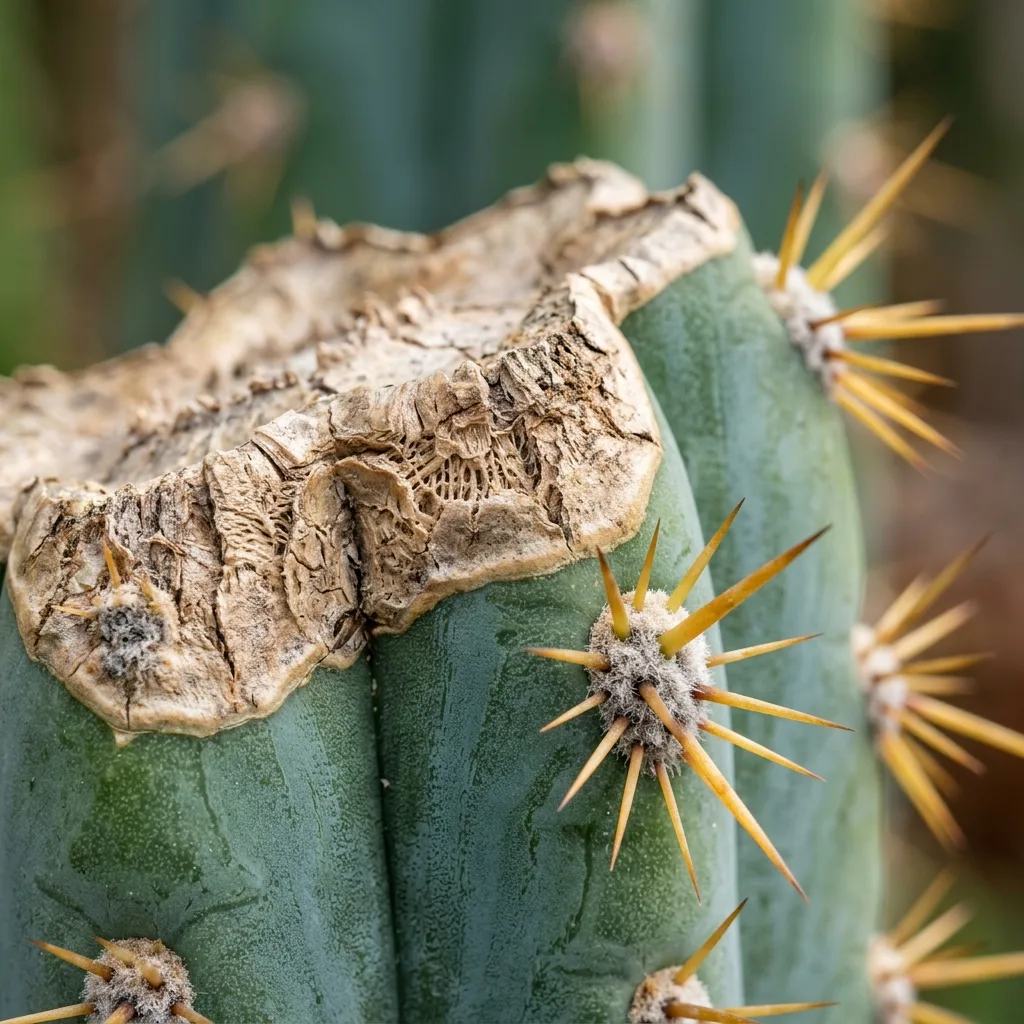
- Locating the Cut Line: If correcting etiolation, cut at least 3 to 4 cm below the narrow stretch, targeting plump, healthy tissue. If excising rot, cut at least 2 to 3 cm above the highest discolored or softened tissue into clean, white-to-pale-green flesh. The exposed cross-section must be utterly free of brown, orange, or translucent rings.
- Decisive Cut and Beveling: Cleave smoothly through the column in one single, confident stroke without a back-and-forth sawing motion. Immediately bevel the outer margins around the perimeter at a 45-degree angle to prevent the drying core from cupping inward.
- Wound Prophylaxis and Callus Curing: Dust the exposed cuts on both the mother plant and the amputated apical segment with pure sulfur powder or fine ground cinnamon. Elemental sulfur is an exceptional, time-tested natural fungicide. Stand the severed cutting upright in an empty, clean ceramic pot or place it upon dry paper in a warm, dry room with good air movement and indirect light. Allow it to rest for 2 to 4 weeks depending on stem girth.
- Planting the Callused Cutting: Once the severed base has formed a hard, corky, grayish-white callus, nestle the cutting 3 to 5 cm deep into completely dry mineral mix. Support tall columns with bamboo stakes or large decorative stones around the base. Do not water for the first 10 to 14 days! After two weeks, lightly mist the substrate around the stem base to coax adventitious roots downward with gentle humidity.
7. Mitigating Rot and Post-Operative Fungal Complications
The primary hazard following surgery is colonization by opportunistic saprophytic and pathogenic fungi. If the wound gets wet or stays in high humidity before corking, yellowish-brown lesions or blackened vascular rings may develop. This coloration indicates that fungal hyphae have penetrated the vascular cylinder. If spotted, act immediately: slice away another 1 to 2 cm of tissue above the infected zone using a freshly re-sterilized blade until clean tissue is exposed, and recoat the fresh wound thoroughly with sulfur.
Approaching your columnar cacti with surgical care preserves valuable plants, revitalizes etiolated specimens, and yields an abundance of vigorous, true-to-type rooted duplicates.


Reader Reviews & Comments 3 Reviews
Eleanor Brooks
Marcus Vance
Julian Hayes
Leave a Review & Rating
Share your plant care tips, experiences, or questions with our succulent community.