






From the sheer limestone bluffs of Mexico to the arid expanses of South Africa's succulent Karoo, xerophytic plants have spent millions of years thriving in rocky fissures virtually devoid of organic matter, rich in weathered minerals, and exquisitely free-draining. In their ancestral habitats, succulent roots breathe within breezy mountain defiles where downpours flash through porous gravel and ambient air circulates freely around every root hair. Regrettably, once welcomed into our living rooms, these resilient marvels are frequently condemned to dense, bagged peat moss blends—depriving them of their most fundamental biological requirement.
Succulent roots do not merely channel water and dissolved ions; they require active gas exchange to fuel cellular respiration, demanding constant access to oxygen. When conventional garden loam or dense peat moss becomes saturated, it collapses into an anaerobic sludge; upon drying, it sets like concrete, mechanically strangling delicate feeder roots like a vice. Frequent watering is rarely an expression of nurture—without aeration, it is an unwitting sentence of suffocation. Becoming a mindful succulent steward begins by recreating nature's mineral architecture at the base of your planter.
Formulating a custom, highly porous granular substrate at home strikes the golden equilibrium between moisture retention and hydraulic conductivity. Enabling xylem and phloem vessels to function without hydraulic shock hinges upon selecting inorganic aggregates with the correct granulometry (particle size distribution). Brew a fresh cup of coffee, and let us explore the botanical foundations of crafting this life-saving potting mix with artisanal precision.
1. Comparative Analysis of Inorganic Mineral Components
Inorganic minerals constitute the physical backbone of an artisanal succulent substrate. Unlike organic matter, these porous aggregates do not decompose or settle over time. They preserve structural macro-pores for years, providing stable, textured anchor points where fine root hairs can latch on and facilitate mineral exchange. However, not all mineral aggregates perform equally; particle dimensions and internal pore geometry dictate overall substrate dynamics.
The quintessential inorganic components for your blend include:
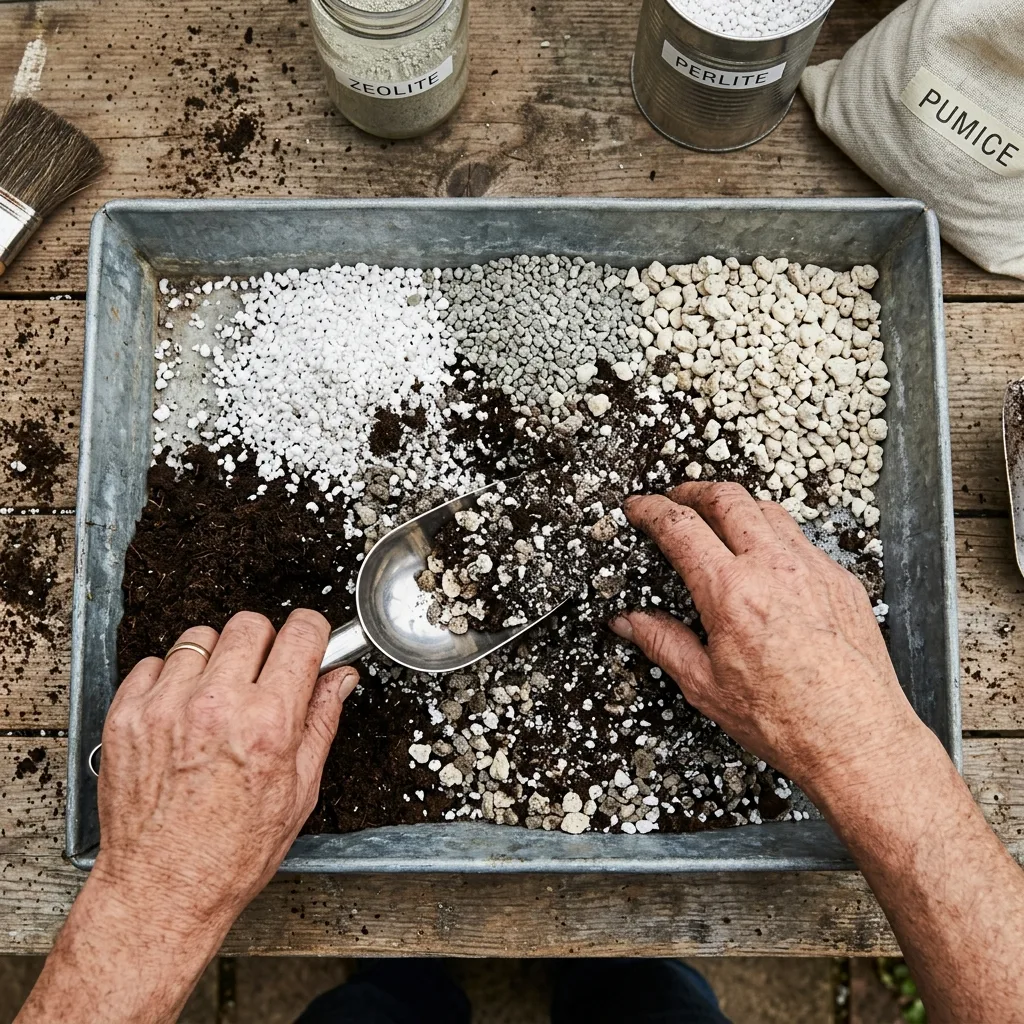
- Horticultural Pumice (3 to 6 mm): The undisputed gold standard of succulent horticulture. This porous volcanic rock possesses an interconnected cellular structure that optimizes aeration while holding an ideal film of internal moisture, releasing it gradually to root hairs without inducing waterlogged conditions. Unlike lightweight perlite, pumice has physical heft and will never float to the surface upon watering.
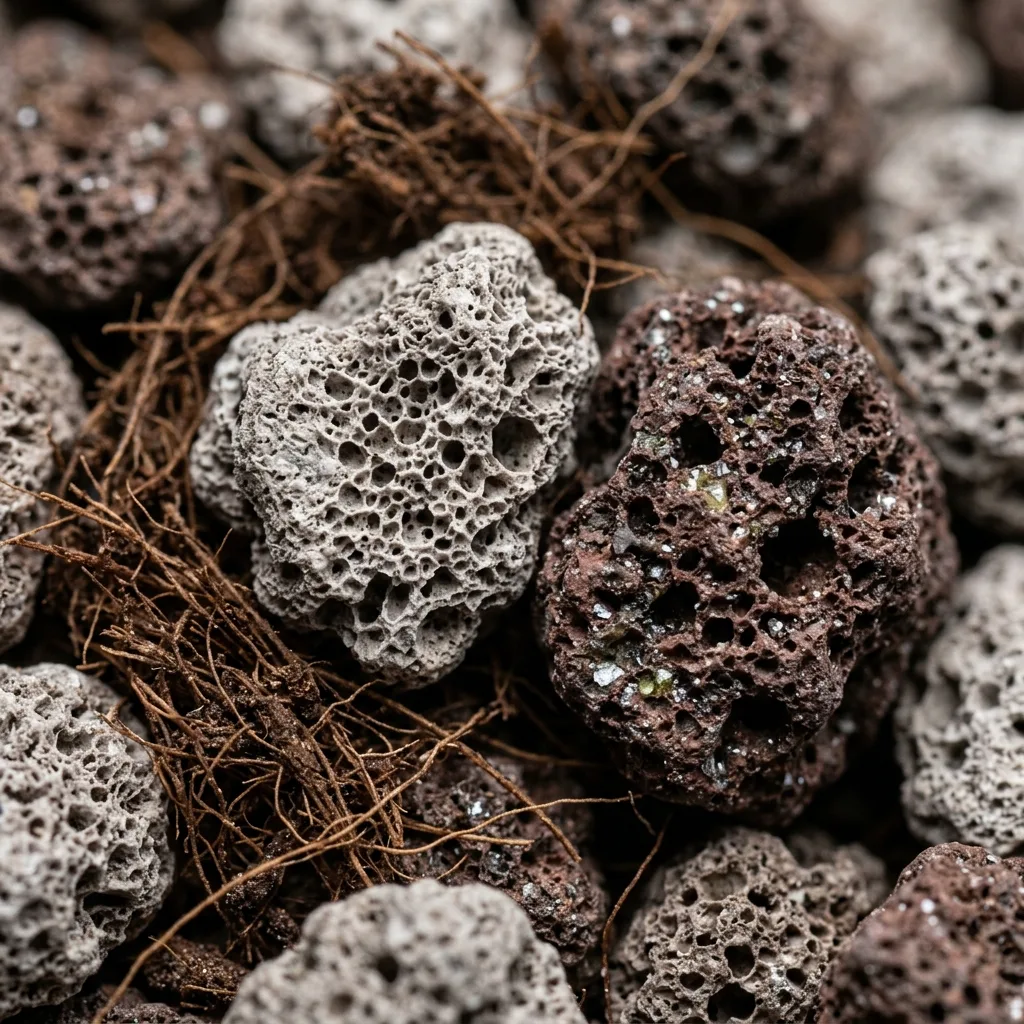
- Lava Rock (Scoria / Red or Black Volcanic Tuff - 2 to 5 mm): Naturally rich in iron, magnesium, and calcium. Its angular, abrasive surface profile stabilizes top-heavy succulents within the pot, encourages vigorous root adhesion, and physically arrests substrate compaction.
- Zeolite (Clinoptilolite - 3 to 5 mm): Exhibits a phenomenal Cation Exchange Capacity (CEC). Zeolite traps excess fertilizer salts and free ammonium, buffering root tissues against osmotic chemical burn and metering these nutrients back to the plant on demand. Additionally, its porous crystalline cage actively suppresses anaerobic bacterial pathogens and foul odors.
- Coarse Horticultural Perlite: A budget-friendly, highly aerated alternative. However, its featherweight nature causes it to float to the substrate surface during bottom or top watering, and its fragile, chalky dust can clog root micropores. Thoroughly sifted pumice remains vastly superior to perlite in long-term cultivation.
- Coarse Quartz Grit (Washed River Grit - 2 to 4 mm): Utilize only sharp, coarse river sand or quartz grit. Fine building sand and beach sand must be strictly avoided; fine sand forms a dense, brick-like mortar when wet, whereas unwashed sea sand introduces lethal sodium and chloride toxicity.
2. Balancing the Organic Fraction: Peat, Coco Coir, and Compost
While minerals establish the drainage scaffold, organic constituents provide essential access to micronutrients and maintain microscopic capillary films around root absorption hairs. For succulent cultivation, organic amendments must be governed by strict moderation.
Standard brown sphagnum peat is renowned for excessive water retention. Worse, once allowed to desiccate completely between watering cycles, peat turns severely hydrophobic. It shrinks inward, pulling away from the container's interior perimeter, causing subsequent irrigation water to rush down the gap and out of the drainage holes without ever hydrating the desiccated root core. Consequently, unamended peat should be replaced with thoroughly rinsed, fibrous Coco Coir or finely graded, aged pine bark fines.
Fibrous coco coir maintains a light, springy matrix around feeder roots and rehydrates effortlessly without becoming hydrophobic. Any organic material incorporated into your succulent blend must be pathogen-free, sterilized, and free from fungus gnat larvae or mealybug eggs. Raw domestic compost should never enter a succulent container; excessive unbuffered nitrogen and active microbial fermentation cause succulent tissues to Grow Jumping Cholla (Cylindropuntia fulgida): Myths, Science, and Botanical Care Guide">to grow overly soft and watery, leaving turgid leaves prone to systemic fungal pathogens.
3. Customized Substrate Recipes for Diverse Genera and Climates
Not all succulent xerophytes share identical hydrological adaptations. Distinct root architectures (tuberous storage roots, fibrous thread-like nets, or deep taproots) and varying Crassulacean Acid Metabolism (CAM) rhythms dictate how rapidly a potting medium must dry out. The following volumetric formulations provide rigorously tested, biologically balanced substrate profiles:
| Plant Group / Genus | Inorganic Mineral Ratio | Organic Fiber Ratio | Recommended Volumetric Formulation |
|---|---|---|---|
| Haworthia & Gasteria | 70% - 80% | 20% - 30% | 40% Pumice + 20% Zeolite + 15% Lava Rock + 25% Coir Fiber |
| Echeveria, Sedum, Graptopetalum | 60% - 70% | 30% - 40% | 40% Pumice + 15% Lava Rock + 10% Coarse Grit + 35% Sifted Coco/Bark |
| Desert Cacti (Mammillaria, Ferocactus) | 80% - 85% | 15% - 20% | 45% Pumice + 25% Lava Rock + 15% Zeolite + 15% Coco Coir |
| Mesembs / Living Stones (Lithops, Conophytum) | 90% - 95% | 5% - 10% | 50% Pumice + 25% Lava Rock + 20% Zeolite + 5% Organic Fines |
4. Selecting the Pot Material: Terracotta, Glazed Ceramic, or Nursery Plastic
Even the most meticulously engineered substrate is constrained by the physical properties of the container enclosing it. Pot selection is an essential hydraulic decision rather than a cosmetic one.
- Unglazed Terracotta: Without question, unglazed baked clay represents the gold standard for succulent longevity. Its porous walls act as a breathable membrane, wicking moisture laterally through capillary evaporation while enabling direct oxygen diffusion directly into the root zone. It serves as an organic safety valve against inadvertent overwatering.
- Glazed Ceramic and Glass Vessels: Side-wall gas diffusion is completely blocked in these materials; water vapor can evaporate exclusively from the exposed upper surface. If you choose glazed planters, you must increase the inorganic mineral fraction of your mix by at least 15–20% and verify that adequate drainage holes exist. Undrained glass terrariums are veritable moist tombs for xerophytic plants.
- Nursery Plastic Pots: Lightweight and capable of maintaining uniform root ball temperatures, plastic pots provide zero lateral wall aeration. However, modern nursery pots with generous drainage lattices perform exceptionally well under outdoor patio conditions when combined with a heavily pumice-dominated mix.
5. Step-by-Step Repotting and Root Pruning Protocol
Follow these precise horticultural steps when transitioning your succulent into its new airy, granular blend:
- Gently Unpot the Plant: Tap the exterior container walls gently to dislodge soil tension. Rather than pulling the plant forcibly by its delicate stem, invert the pot and ease the root ball into your palm. Avoid handling the rosettes directly; the silvery-white farina coating on the foliage is the plant's natural epicuticular sunscreen and moisture barrier, easily wiped away by finger contact.
- Dislodge the Nursery Plug: Using a blunt wooden chopstick or bamboo skewer, teasingly unpick the old, hard nursery peat from around the root core. Do not fear exposing bare roots; leaving a compacted peat core intact prevents water from transferring between the fresh granular mix and the plant.
- Root Pruning: Inspect the root system closely. Using flame-sterilized shears, prune away hollow, dry, black, or root-bound spiraling root filaments. This surgical trimming prompts a surge of localized auxin hormones, initiating a flush of vigorous feeder root development.
- Potting Up: Position a small square of fiberglass mesh over the pot's drainage hole to retain the substrate without blocking drainage (avoid placing large rocks over the opening). Add a generous base layer of granular mix, position the root crown centered at the rim, backfill gently with substrate, and tap the pot lightly against your potting bench to settle the aggregates between the roots. Avoid compressing the dry medium aggressively with your fingers.
6. Post-Repotting Care: The Absolute Dry-Rest Rule
In standard tropical houseplant care, repotting is routinely followed by a thorough drenching to settle the soil. In the succulent realm, this common practice is often fatal! The mechanical disturbance of unpotting and pruning generates microscopic tears and abrasions across root tissue. If these open vascular wounds are exposed to saturated substrate, dormant fungal spores and opportunistic soil bacteria can enter instantly, causing basal stem decay within days.
After repotting your succulent, refrain from watering for at least 5 to 7 full days. Situate the planter in a bright, warmly sheltered position with good airflow, shielded from direct, scorching midday sunlight. During this dry-rest window, damaged root ends undergo suberization—forming a protective, callused scar tissue—while actively generating new microscopic root hairs in search of ambient moisture. The first watering a week later will initiate vigorous, safe root establishment without the threat of rot.


Reader Reviews & Comments 3 Reviews
Julian Vance
Eleanor Sterling
Marcus Bennett
Leave a Review & Rating
Share your plant care tips, experiences, or questions with our succulent community.