






Across the rugged canyons of Oaxaca and the wind-swept bluffs of the Succulent Karoo, xerophytic flora do not dwell in uniform, pristine soil beds; instead, they anchor tenaciously into fractured rock fissures, scree chutes, and mineral talus. When a cherished terracotta planter topples on our balcony or patio after an unexpected gust of wind, that sharp shatter sounds initially like an irreversible domestic tragedy. In the discerning eyes of a botanist, however, a fractured planter is a magnificent landscape canvas that allows us to recreate natural lithic erosion, strata formation, and cliffside microtopography. Whether you choose to mend the broken shards using traditional Kintsugi-inspired philosophies or construct cascading vertical tiers for an expressive broken pot succulent garden, the true physiological triumph lies in the exceptional root-zone gas permeability this open structural architecture delivers.
The greatest hidden liability of conventional, deep, monolithic containers is gravity-driven moisture accumulation at the base, which creates oxygen-depleted (anaerobic) zones. Succulent roots respire vigorously, demanding continuous gas exchange via atmospheric oxygen diffusing through macroscopic and microscopic substrate voids to synthesize cellular ATP. A fractured, multi-tiered planter design geometrically multiplies the total soil surface area in direct contact with ambient air. This physical configuration facilitates highly uniform capillary evaporation, eradicates stagnant water pockets, and maximizes the respiratory efficiency of the root rhizosphere. Now, let us merge this sculptural aesthetic with root anatomy to engineer an enduring, resilient sanctuary for your succulents.
1. Comparative Analysis of Inorganic Mineral Components
In fractured planter arrangements and repaired modular vessels, the single most critical structural element is the coarse inorganic mineral fraction. These granular aggregates prevent steep, sloping substrates from washing out during irrigation while preserving expansive open-air channels throughout the root network. Conventional organic potting soil rapidly slumps into a dense, impermeable silt that leaches through perimeter fissures; thus, porous minerals must form the core architectural skeleton:
- Pumice (Horticultural Grade - 3-6 mm): A vesicular volcanic silicate formed by trapped expanding gases during lava solidification. Pumice absorbs 25-30% of its dry weight in capillary water within its micro-voids, all while its rugged macro-pores continuously bathe surrounding root xylem tissues in ambient oxygen. It is the indispensable structural anchor of terraced planter steps.
- Lava Rock (Scoria - 2-5 mm): Heavy, highly angular basaltic gravel rich in oxidized iron and structural magnesium. Scoria acts as an erosion-resistant ballast within steeply canted shard beds. Its angularity locks cascading ceramic shards firmly in place and offers textural micro-crevices for fibrous succulent roots to grip securely.
- Clinoptilolite Zeolite (2-4 mm): A crystalline microporous aluminosilicate endowed with exceptional Cation Exchange Capacity (CEC). Zeolite acts as an active chemical buffer, sequestering excessive dissolved fertilizer salts and ammonium to shield root hairs from osmotic shock, slowly releasing these nutrients back into the rhizosphere on physiological demand.
- Quartz Grit and River Pebbles (3-5 mm): Completely chemically inert, non-porous aggregates. They hold zero moisture, serving purely as mechanical drainage pathways, stabilizing structural counterweights, and preventing dynamic substrate slippage behind vertical terracotta retention shards.
2. Organic Matter Balance: Peat Moss, Coco Coir, and Screened Compost
Because open, stepped planter assemblies experience far greater atmospheric exposure and accelerated drying rates, the physical quality of your organic fraction is paramount. Conventional sphagnum peat moss exhibits severe hydrophobicity once dehydrated, pulling away from planter walls and crumbling out through drainage fissures as a dusty powder while resisting re-wetting. Consequently, the organic components must maintain durable tensile fiber strength even under prolonged arid cycles:
Washed coconut coir (pith mixed with fine fibers) remains readily hydrophilic even when bone dry, locking adjoining substrate layers together like a cohesive matrix behind cracked shard terraces. Completely mature, fine-sifted worm castings (vermicompost) or leaf mold should never exceed 5-10% of the gross soil volume; higher percentages clog granular macro-pores and induce root suffocation. Frequent watering is never an expression of plant affection; rather, it asphyxiates xerophytic root networks by eliminating pore space. Hence, your organic matter should serve strictly as an invisible botanical mortar distributed through the mineral framework to carry subtle capillary moisture and essential trace micronutrients.

3. Precision Soil Formulation Matrix for Succulent Genera and Micro-Zones
Different xerophytic genera feature wildly divergent moisture consumption rates, epidermal transpiration coatings, and root morphologies. In an open broken-pot terraced arrangement, upper tiers shed water rapidly and experience intense solar radiation, whereas lower base reservoirs preserve moisture reserves considerably longer. Formulate and position your substrate according to the specialized micro-zones below:
| Plant Group / Botanical Genus | Inorganic Ratio (Pumice/Scoria/Zeolite) | Organic Ratio (Coco Coir/Worm Castings) | Particle Size Range | Ideal Position Within Broken Planter |
|---|---|---|---|---|
| Haworthia & Gasteria | 70% (Pumice + Zeolite dominant) | 30% (Fibrous Coco Coir) | 3 - 5 mm | Lower tiered basins, semi-shaded fissure pockets |
| Echeveria & Graptopetalum | 75% (Equal Pumice, Scoria, Coarse Perlite) | 25% (Coco Coir + 5% Castings) | 2 - 4 mm | Middle to upper dynamic terraces, full solar aspect |
| Desert Cacti (Mammillaria, etc.) | 85% (Scoria + Pumice + Quartz Grit) | 15% (Triple-washed Coco Coir only) | 4 - 6 mm | Prominent apex summit, zero pooling zone |
| Lithops & Mesembs | 95% (Zeolite, Pumice, Coarse Silica Sand) | 5% (Sifted botanical peat dust) | 1 - 3 mm | Isolated shard pocket, hyper-drained micro-fissure |
4. Planter Material Dynamics: Terracotta, Unglazed Ceramic, and Plastic
Understanding substrate thermodynamics and vapor transmission through the planter wall itself is essential when choosing to repair or repurpose broken pottery. Terracotta (low-fire earthenware) contains an open microporous matrix. The vessel walls themselves breathe, wicking internal moisture toward the exterior face where it evaporates seamlessly. When terracotta fractures, it leaves rough, highly irregular structural margins that mimic natural rock fractures, granting succulent root tips an ideal tactile substrate to anchor against.
While high-fire unglazed stoneware exhibits similar porous advantages, glazed ceramics and plastics entirely block gas and vapor exchange. Fracturing a plastic pot results in slick, structurally uncooperative walls and dangerously sharp edges capable of severing delicate plant taproots under settling soil pressure. Therefore, terraced rock gardens and Kintsugi horticultural repairs should be reserved exclusively for terracotta and unglazed earthenware. In hot summer conditions, porous terracotta pulls ambient heat out of the rhizosphere via continuous evaporative cooling, preventing thermal root burn and cellular collapse.
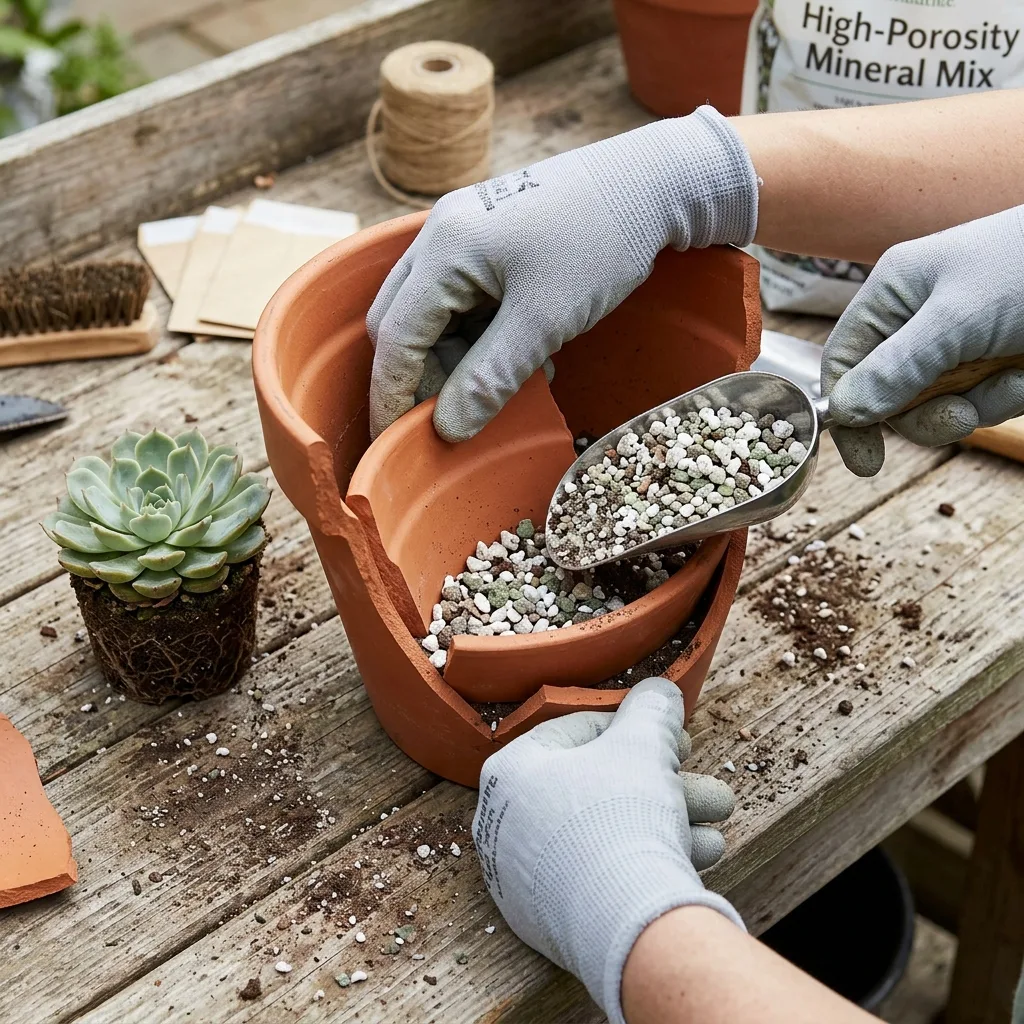
5. Step-by-Step Repotting, Structural Repair, and Apical Root Pruning
Faced with broken terracotta, you have two creative horticultural avenues: structurally restoring the original silhouette through safe repair techniques, or converting the fractured shards into a multi-tiered rockery garden. Follow this botanical protocol:
- Option A - Structural Restoration (Safe Ceramic Repair): If your goal is preserving the intact vessel form, select a completely solvent-free, non-toxic, 100% cured epoxy putty or waterproof cyanoacrylate adhesive designed for inert outdoor masonry. For an artistic finish inspired by Japanese Kintsugi, blend fine mica powder or ground natural mineral pigments into the slow-cure epoxy prior to seam application. Allow the bond to fully crosslink and off-gas for at least 48 hours in a well-ventilated dry area before introducing soil or moisture. Confirm that the primary drainage hole remains completely unobstructed.
- Option B - Multi-Tiered Broken Pot Garden: Place the largest curved ceramic fragment upright against the back or interior edge of the damaged base pot to serve as an internal retaining wall. Stack sequentially smaller shards descending downward to form stepped, stable mini-terraces, securing each layer firmly with compacted granular mineral substrate behind it.
- Root Preparation and Corrective Pruning: Gently unpot your succulents. Using a soft wooden stylus or botanical probe, carefully tease away legacy nursery peat compacted around the core root ball. Inspect the subterranean architecture and excise any blackened, hollow, or desiccated lateral roots with sterilized micro-shears. Pruning back approximately one-third of the dense fibrous capillary root mass stimulates apical meristematic activity, prompting the swift eruption of vigorous new root primordia.
- Substrate Layering and Mechanical Anchoring: Place a foundation layer of coarse, chunky scoria or pumice across the main bottom drainage aperture to secure free water runoff. Backfill behind each ceramic shard tier with the specialized mineral substrate tailored to your selected species, tapping the vessel lightly to eliminate large underground air cavities without pulverizing the porous aggregates into dust.
- Botanical Placement and Farina Preservation: Plant prostrate, trailing varieties (such as Sedum morganianum or Curio rowleyanus) directly alongside the sharp broken rim edges so they cascade organically down the outer walls. Settle compact rosette-forming succulents (such as Echeveria or Graptoveria) into the central plateaus. Take great care when handling rosette specimens: the chalky epicuticular wax (farina) coating their leaves functions as natural botanical sunscreen and moisture insulation; handling leaves by their edges prevents rubbing off this protective barrier.
6. Post-Repotting Horticultural Protocol: The Absolute 'Dry-Rest' Imperative
In traditional ornamental gardening, newly potted foliage plants are immediately saturated with heavy amounts of water to settle the soil. In the cultivation of succulents and desert cacti, this practice is frequently fatal. During repotting, shard placement, and root trimming, the root epidermis inevitably sustains micro-abrasions and cellular tears. If dampness immediately saturates these unhealed entry points, opportunistic fungal pathogens like Fusarium oxysporum, Pythium, and Phytophthora quickly invade the vascular bundle, initiating systemic black root rot.
Adhere strictly to the botanical 'Dry-Rest' principle: Do not apply water for 5 to 7 days following installation. Within the aerated, bone-dry mineral substrate, the damaged root cells quickly synthesize a suberized protective layer, forming a biological callus over all incisions. House your newly established broken-pot landscape in an airy, brightly lit location shielded from harsh midday sun during this critical healing window. Once the week concludes and roots begin actively seeking moisture by generating fresh root hairs, administer a deep, thorough drenching until pure water flows unobstructed from the bottom drainage port.


Reader Reviews & Comments 4 Reviews
Julian Vance
Dr. Marcus Bennett
Heather O'Connell
Clara Lindqvist
Leave a Review & Rating
Share your plant care tips, experiences, or questions with our succulent community.